During my first weeks at the Recurse Center, I found out about a programming fundamentals course in Python. The very first lab of that course was about modifying wav files.
After working through that lab, I was surprised by how straight-forward wave files could be modified – you just needed to alter the values in a list. However, the lab used an external library (wave.py) to perform the read and write operations of wave files. Since I really wanted to understand how it was done, I decided to program it myself: a program to read and write wave files from the command line.
I decided to write it in C because I didn’t know how to access the bit-level representation of files using Python.
Structure of .wav files
Header
Like any kind of data or program, wav files are just a bunch of 1 and 0. In order to be properly recognized when you open them, the first bytes of a wav file contain information to identify it and the sound that it encodes. For a more detailed description of the header, I highly recommend this page.
Samples
After the header information, which usually takes 44-bytes, we have the data that represents the sound we want to reproduce. These are the samples. They come in 8-bit and 16-bit flavors, which are just the same as char and short data-types in C (at least on most machines). The bits of each sample are represented in little-endian ordering.
These samples are stored in a contiguous fashion, alternating between each channel. For instance, if the file has two channels, they represent the left and right speakers in your audio output. Each one of them has its separate set of samples. That’s how we can have no audio on one of the channels, say the left one, and we’ll only hear sound from the right channel.
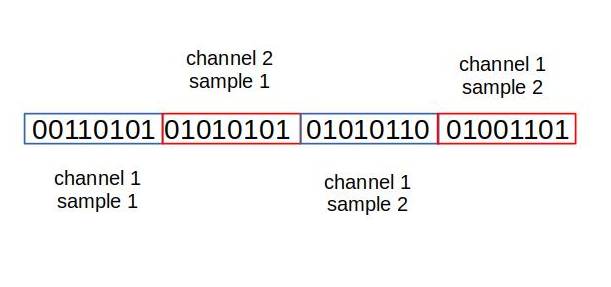
One of the applications of more sound channels is games and movies. They are used to have specific sounds come from different directions. For the purposes of this presentation, we’ll limit the channels to either 2 (stereo) or 1 (mono).
Both the number of channels and the sampling rate are present in the header of the wave file. We just saw what the channels represent. The sampling rate is the number of samples that we have in a single second. They’re expressed in hertz (Hz), the unit used to denote quantity per second (as in samples per second in this case).
For instance, a sampling rate of 100 Hz means that we have 100 samples, for every channel, each second. If we have 2 channels, that’s 200 samples in one second.
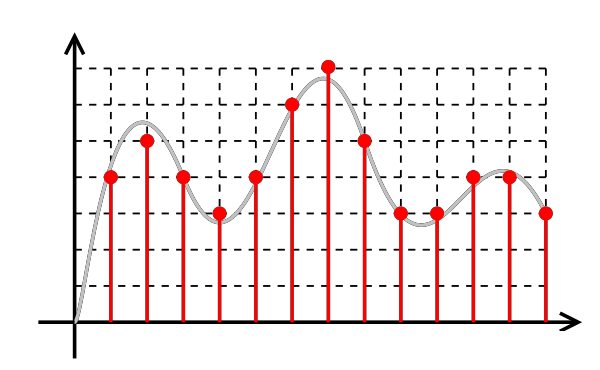
Each sample represents the value of the sound wave at one specific point. This can be seen in the figure below. The original wave is in grey and the samples are the red dots. For a more detailed explanation, you can check here.
Structure of the program
Now that we are more familiar with the structure of wav files and how they store the sound samples, we can introduce the program used to modify it.
The program was divided into several files which are referenced from main.c. These include functions to read the header (wav_header.c), read and write the samples (wav_data.c), and execute operations to modify the samples (wav_process.c).
-\  main.c
  |- wav_types.h
  |- wav_header.c
  |- wav_data.c
  |- wav_process.c
  |- helper_functions.c
Main program
The main.c contains the structure of the whole program, which could be described as:
/* define option flags */

int main(int argc, char *argv[]) {
  /* process options */
  /* open input .wav file */
  /* read header */
  /* process samples according to passed options */
  /* write output .wav file */
}
The process options step refers to reading the options passed from the command line to the program. For example, in ./my_program -e -d the options are e and d.
For this program, we included the following options:
L, to mute the left channel.o, to specify the output file name.p, to print the header information.r, to reverse the samples.R, to mute the right channel.
Reading the header: wav_header.c
The most interesting aspect while reading the header was defining a C struct with the “shape” of the wave file header.
struct header_struct {
  char chunk_id[4];
  union int_data chunk_size;
  char format[4];
  char subchunk1_id[4];
  union int_data subchunk1_size;
  union short_data audio_format;
  union short_data num_channels;
  union int_data sample_rate;
  union int_data byte_rate;
  union short_data block_align;
  union short_data bits_per_sample;
  char subchunk2_id[4];
  union int_data subchunk2_size;
};
Once it was defined, the header bytes could be read directly. A detailed description can be found in the post about reading the header which was the origin of this program.
Modifying the samples
The wave samples were read into an array of short values. This process involved reading one or two bytes at a time (for 8-bit and 16-bit samples, respectively) into the samples array. The corresponding functions are in wav_data.c.
Once the samples were read, all of the possible modifications were in wav_process.c. Depending on the nature of the modification, they involved performing simple modifications on the array of samples. For example, muting one channel involved setting all of its samples to value 0.
Finally, the bytes of the header and the modified samples were written into a new file. This process was analogous to that of reading the bytes but it was easier as the header struct and the samples array already ordered the bytes in the same order as they would be in the .wav file. At the moment I’m writing this post, this process isn’t completely generalized. It was assumed that the machine was little-endian and that the sample size was of 16-bits.
Utilization example
Now that the program has been introduced, let’s see how it’s used.
You can get the complete source code here. With them in your local repository, you can compile it with Makefile:
$ make
It will create an executable of the program called wave.
To get help information:
$ wave -h
Usage: wave file
   or: wave [OPTIONS] file
Print wave wave file header data or modify it.

Options:
  -h                print help and exit
  -L                mute left channel (stereo only)
...
Printing the header of a wav file:
$ wave my_file.wav
ChunkID: RIFF
ChunkSize: 132336
Format: WAVE
Subchunk1 ID: fmt
...
To reverse the samples (to hear it backwards):
$ wave -r my_file.wav
It will write the changes to a file output.wav in the working directory. The output file name can be specified adding the option -o output_name.wav on the command line.
Conclusion
Writing this program was a good opportunity to learn more about the bit-level representation of data, particularly of sound files. Refining the program took much more time than getting it to a basic working state (the devil is in the details).
I started writing it in a single file but as it grew larger, it was necessary to break it into several files. At this stage, the importance of managing the complexity became evident. While this program is functional and adding more features isn’t very complicated, it lacks a proper layered structure and abstraction of details that would allow it to easily use some of its features for other programs. A good example of what I mean by this is the Python wave library, which offers functions to read and write wave files and abstracts all of the details of its implementation to the user.
The complete source code can be found here.
Any comments? Feel free to comment below!